
It's been a while since I posted a recipe here, but my niece has decided to be a vegetarian and her mom needed some protein-rich veg recipes that would satisfy the whole family. I gave her a list of my favorites, most of which I've already posted. This one happens to be easy and satisfies the occasional Sloppy Joe craving.
Sloppy Lentils
(Adapted from Fresh from the Vegetarian Slow Cooker)
Makes 4 to 6 servings
Ingredients
1 TBSP olive oil
1 medium yellow onion, chopped
1 small red or green pepper, seeded and chopped
1 TBSP chili powder
1 1/2 cups dried brown lentils, picked over and rinsed
One 14.5 oz can crushed tomatoes
3 cups water
2 TBSP soy sauce
1 TBSP yellow mustard
1 TBSP brown sugar
1 TBSP maple syrup
1 tsp salt
Black pepper to taste
Instructions
1. In a large skillet, heat the oil over medium heat. Add the onion and pepper and cook until softened, stirring occasionally. Add the chili powder and stir to mix well. Cook for 30 seconds more, then remove from heat.
2. Transfer the mixture to the slow cooker. Add the remaining ingredients and stir to combine. Cover and cook on Low for 8 hours.
Serve on burger buns and top with coleslaw (optional). I like to top mine with a tangy broccoli slaw (mix a bag of broccoli slaw with a tangy dressing made by whisking together about 1/4 cup light mayo, a TBSP soy sauce and TBSP rice vinegar).
Monday, February 11, 2013
Recipe: Sloppy Lentils and Tangy Slaw

Friday, August 19, 2011
Chunky Gazpacho Recipe
A fruits and vegetable fast will drive a girl to all sorts of creativity in the kitchen. Especially when she's gone overboard at the farmers market. I've been craving soup lately for some reason, but since it's still rather warm outside, I thought a cold soup would be the best bet. I was waffling between a raw Tomato Basil Soup and gazpacho. Since I needed to use up as many vegetables as I could, I pulled out the food processor, some tomatoes, peppers, an onion, garlic, and cilantro and got to work. This soup is so easy to make, and it's absolutely delicious.
I modified a gazpacho recipe from Vegetarian Times for an easy, chunky gazpacho version.

Chunky Gazpacho
(Adapted from Vegetarian Times)
Ingredients:
3 large ripe tomatoes, stemmed and quartered
1 large ripe tomato, finely diced
1 cucumber, peeled and sliced (finely dice about a handful and reserve)
1 green peppers, seeded and quartered (finely dice about a handful and reserve)
1/2 red pepper, seeded and halved again (finely dice about a handful and reserve)
1/2 large red onion, peeled and sliced thickly (finely dice about a handful and reserve)
2 Tbs. olive oil
2 Tbs. cider vinegar
2 large cloves garlic
Large handful of cilantro
Salt and freshly ground black pepper to taste
Avocado, diced for garnish (optional)
Instructions:
Place diced tomatoes, cucumbers, green and red peppers and onion in a large bowl. Combine the remaining tomatoes, cucumber, peppers, and onion in food processor. Add olive oil, vinegar, garlic, salt and pepper, and cilantro. Pulse until mostly smooth, then pour into the bowl with the diced veggies and stir to mix. Serve immediately at room temperature or chill. Top with diced avocado right before serving.
Tuesday, June 28, 2011
A Summer Feast
It's been a while since I've written a food post, but this week's haul from the farmers market and a desire to try a little bit of everything, has me inspired and I thought I'd share my recipes.
The first thing I made was what I thought would be a pasta sauce, but what I'm now calling Chunky Tomato and Summer Squash Sauce with Beans. I served it over couscous, but it would be great over pasta or any whole grain, or on its own with a hunk of crusty bread. Keep in mind that it's just as good at room temperature as it was warmed up, so it's a great option for a summer picnic or a quick dinner.
Next was Raw Kale Salad with Creamy Tahini Dressing. I cut a large bunch of what I thought was kale, but once I got home realized was probably collard greens, into thin strips. I rinsed and drained it well, then put it in a large bowl. I made a batch of the dressing and drizzled about half of it over the greens, tossing it all together. The result was a tangy, nutty, raw salad. I only wished I'd had some sesame seeds to sprinkle over it. To use up the remaining dressing, I sliced three kohlrabi heads and tossed them with the dressing, making a bowl of crunchy kohlrabi matchsticks that I'll probably add to the Kale Salad at some point.
I also cooked up some red potatoes, green beans and a couple of hard boiled eggs to make my favorite potato salad. And I bought some tomatoes, fresh mozzarella and a bunch of basil for the sole purpose of having a Caprese salad.
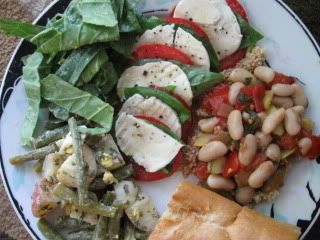
In case you're interested in giving some of these recipes a try, the tomato sauce and kale salad recipes are below, and you can link to my previously posted recipe for Potato and Green Bean Salad.
Raw Kale Salad with Creamy Tahini Dressing
Ingredients:
1 large bunch kale, stalks removed, cut into thin strips
3 TBSP tahini
1/2 tsp crushed red pepper flakes
5 TBSP lemon juice
1 clove garlic, pressed
1 TBSP soy sauce
sea salt to taste (a dash is all that's necessary)
Instructions:
Place the kale strips into a large bowl. In a small bowl, whisk together the remaining ingredients for the dressing. Drizzle about half the dressing over the kale and toss to coat well. Add more dressing to taste. Store the remaining dressing in a sealed container in the refrigerator for up to 10 days.
Tomato and Summer Squash Sauce with Beans
Ingredients:
1 TBSP olive oil
3 cloves garlic, chopped
1 yellow onion, chopped
1 medium zucchini, halved and thinly sliced
1 medium yellow squash, halved and thinly chopped
4 or 5 large ripe tomatoes, chopped
Salt and pepper to taste
1 (15 oz) can Cannellini or Kidney beans, rinsed and drained
1/4 cup balsamic vinegar
Instructions:
Heat the olive oil over medium heat until shimmery. Add onion and garlic, and cook until garlic is fragrant and onions are beginning to turn translucent, stirring often. Add the zucchini and squash, sprinkling with pinch of salt and freshly ground pepper, and cook until just tender, stirring occasionally to make sure they don't stick. Add the tomatoes, beans and vinegar and stir to mix completely. Cook just a few minutes more, until the tomatoes and beans are heated through.
Serve warm over pasta, couscous, rice, or any other grain. Can also be eaten as a room temperature salad, over a grain or on its own with a hunk of crusty bread.
Friday, July 02, 2010
Recipe: Chipotle Hummus
Hummus is one of my favorite things to make when I need to bring something to a party or when I know I'll need some quick lunches or dinners. It's easy, flexible and so good. A high school friend mentioned she was eating chipotle hummus and it made me thing I should try whipping up a batch. This is the recipe that resulted, just in time for those Fourth of July barbecues. Whip a batch up and impress all your friends.
Chipotle Hummus
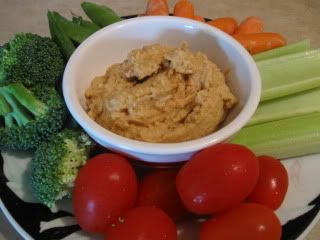
1 15-oz can chickpeas; drained, liquid reserved
1 large clove garlic
1 chipotle pepper, canned in adobo sauce
juice of 1 lime
1 TBSP olive oil
1 TBSP tahini (optional)
Instructions
1. In a food processor, combine chickpeas, garlic, chipotle pepper, lime juice, olive oil and tahini. Process on low.
2. Add 1 TBSP reserved chickpea liquid at a time, processing until hummus is desired consistency.
It's as simple as that. And healthy, too. Serve hummus on a veggie sandwich or as a dip for veggies and pita chips.
Monday, June 28, 2010
Recipe: Southwest Black Bean Burgers
A lot of my favorite recipes are the result of looking for cheaper and easier ways to fit protein into my meatless diet. I love the convenience of frozen bean or soy burgers, but they're not exactly budget friendly. When Alana at A Veggie Venture posted a recipe for black bean burgers, I immediately gave them a try. They were delicious, so I filed away the recipe for future use -- and promptly forgot about it.
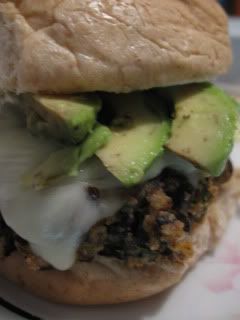
Fast forward a year and I've got black beans in my freezer from the farmers' market last season that need to be cooked and used to make room for fresher veggies. While I'm slow cooking them, I start to smell grilling food and craving burgers, but not the beef or turkey kind. I start craving those black bean burgers. I pulled up the recipe and got to work whipping up a slightly altered version based on what I had on hand.
Southwest Black Bean Burgers
Adapted from A Veggie Venture
(Makes 4 regular burgers or 6 sliders)
1 1/2 TBSP olive oil, divided
1/2 cup chopped yellow onion
1/2 a 4 oz. can chopped green chilies
2 cloves garlic, roughly chopped
1/2 cup fresh cilantro
1 1/2 cup cooked black beans (or 1 - 15 oz. can, drained and rinsed)
1 large egg, lightly beaten
1/2 cup bread crumbs
1/2 tsp cumin
1/2 tsp chili powder
1/4 tsp kosher salt
Instructions
1. Heat 1/2 TBSP olive oil over medium heat in a large skillet. Add the onion, green chilies and garlic and saute until the onions begin to brown, stirring frequently.
2. Transfer to a food processor and add the cilantro. Pulse a few times until roughly chopped.
3. Add the beans to the food processor and pulse several times, just until the beans are broken up into small chunks but not too pasty.
4. Put the bean, onion, chilies and garlic mixture into a large bowl. Add the egg, bread crumbs, cumin, chili powder and salt. Stir with a fork until well blended.
5. Form into four large patties (or 6 smaller ones). (If you are planning to eat them later, refrigerate at this point. You can also freeze them after they've chilled for about an hour. Just put them in a freezer bag. Thaw completely before cooking.)
6. Heat the remaining 1 TBSP olive oil in a large skillet.
7. Carefully add the burgers to the oil and cook 2 to 3 minutes on each side until browned and warmed through.
I wouldn't grill them unless, as Alana recommends, you use a grill basket. They're not solid enough to stand up to the grill grates. But they are hearty and flavorful enough to please just about any meat eater. I like mine topped with pepper jack cheese, sliced avocado and tomato, and a little bit of mayo. I'd suggest you make a double (or triple) batch and freeze some for later. You'll be thankful you did. These things are addictive!
Tuesday, June 08, 2010
POM Wonderful -- It's Not Just for Drinking
I received a case of POM Wonderful 100% pomegranate juice after FitBloggin'10, and while I'm not much of a fruit juice drinker, I was happy to give this a try. After all, pomegranate is supposed to be one of those antioxidant-filled super foods. And those POM-tinis we were served at the FitBloggin' reception were quite tasty. If nothing else, I'd have plenty of juice for cocktail making.
I did enjoy a few POM mocktails (1 part POM, 1 part seltzer water), but by far my favorite thing to do with my POM has been to cook it. Yep. That's right. I've been using POM in my recipes. I've made a delicious, citrus-y salad with a pomegranate vinaigrette dressing, and a pomegranate glaze that would be great on just about any protein. I used it on shrimp, but I'm planning to try it on salmon, as well as on tofu.
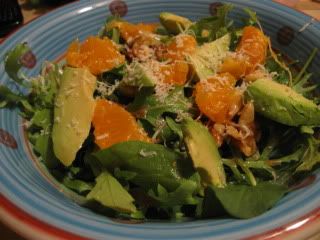
Makes 2 servings.
Ingredients
Dressing:
1/4 cup POM
2 TBSP balsamic vinegar
2 TBSP extra virgin olive oil
salt and pepper to taste
Salad:
6 cups arugula
1/2 avocado, cut into bite-sized pieces
2 clementines, peeled and segmented
1/4 cup walnut pieces
1 TBSP grated fresh Parmesan cheese
Instructions
1. Divide arugula, avocado, clementine segments and walnut pieces between two serving dishes.
2. In a small bowl, whisk the dressing ingredients until well combined.
3. Drizzle salads with about 2 TBSP each of the dressing. (There will be plenty of dressing left over for future salads.)
4. Top each salad with about 1/2 TBSP grated Parmesan cheese.
I ate this as an entree salad one night, but I used the dressing on salads throughout the week. The sweet tangy-ness of the dressing is a great compliment to the peppery arugula, but it was also good over a baby greens mix and romaine lettuce.
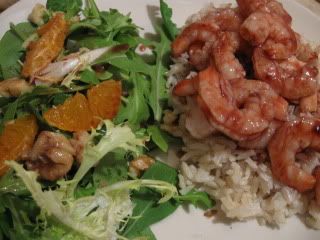 Pomegranate Glazed Shrimp
Makes 4 servings.
Ingredients
3/4 cup POM
2 TBSP balsamic vinegar
1 tsp brown sugar
1 tsp corn startch
12 oz cooked, shelled shrimp
Instructions
1. In a medium saucepan, whisk together first four ingredients over low-medium heat.
2. Bring to a simmer and cook uncovered, stirring frequently for about 15 minutes or until thickened.
3. Toss shrimp with glaze and serve.
I served the shrimp over cooked brown rice with the citrus-y salad on the side. It was the perfect combination.
Thursday, June 03, 2010
Review: The Kind Diet by Alicia Silverstone
Long before I stopped eating meat (a year ago this past weekend), I started thinking a lot about how what I eat affects me and the world around me. It started with a desire to eat more locally grown and sourced foods, but it evolved into something bigger. As I read books like The Omnivore's Dilemma

The next logical step for me was, to the best of my ability, to eat meat that was sustainably, organically, and locally raised. And as the cost of this decision weighed on my budget, I decided that eating less and less meat might be a good idea. Eventually, meat dropped off my menu radar, and I've been OK with that for a year now. Especially after watching Food, Inc


Part I of The Kind Diet is the rhyme and reason of eating a diet that is kind both to your body and to the earth. As I started reading Part I, I felt like Silverstone was preaching to the choir. I knew much of what she was telling me: that eating meat and animal products affects not only animals, but ultimately the environment, soil quality, fossil fuel consumption and more. But as I read more, I learned (or was reminded of) more. Silverstone isn't preachy. Her opinion on the subject is very clear, but she gives you the facts and plenty of information so that you can make your own educated decision. Throughout this first section, I found myself nodding along with her friendly encouragement, and even (*gasp*) considering trying a vegan diet for a month. (No Greek yogurt? No cheese? Yikes!)
Part II describes how you can begin "Living The Kind Life". Unlike other "diet" books, Silverstone doesn't encourage readers to jump into an extreme diet from the get-go. Instead, she describes how readers can "Flirt" with eating a kinder diet, begin going vegan, and then become a "superhero". She suggests you choose the plan that fits where you are now and give it a try. Then, as you get used to eating in a new way, you can increase your commitment, until eventually you're a Superhero. She makes giving up meat, fish, dairy products and processed foods seem simple, gradual, almost painless. Of course, she also encourages adding foods that are pleasing to your palate so that you don't miss those foods nearly as much. And she gives suggestions on ways that you can begin to make the shift toward kind eating if you're not ready to go all the way, and still see some of the positive effects.
Part III is a rather impressive collection of Vegan and Superhero recipes. I have to admit that I haven't tried any of the recipes yet, but I am looking forward to it. Who could resist the allure of vegan Peanut Butter Pie and Mixed Berry "Cheese"cake? And then there's the Risotto with Oyster Mushrooms, Leeks and Peas, and Rice Pilaf with Caramelized Onions. I'll be sure to share them with you once I get around to making them.
In the meantime, I'd recommend you check out The Kind Diet

Thursday, May 27, 2010
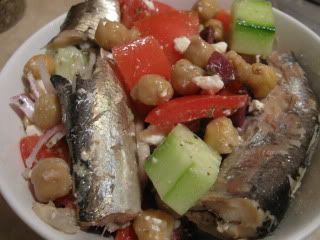
Recipe: Greek Chickpea Salad with Sardines
I came across this recipe while reading Eating Well during one of my workouts and I couldn't wait to get home and try it. I'd never had sardines before, so I wasn't sure what to expect. It turns out I love them. And I'm expecting this recipe will become a summertime staple. It's quick, easy and light, perfect for a hot summer evening--and leftovers were a perfect lunch the next day.
(Adapted from Eating Well)
Ingredients
Dressing
Juice from 2 lemons (abt. 3 TBSP)
2 TBSP extra-virgin olive oil
1 medium clove garlic, minced or pressed
2 tsp dried oregano
1/2 tsp freshly ground pepper
Salad
4-5 roma tomatoes
1 large, seedless cucumber
1 15-oz can chickpeas, rinsed and drained
2 oz feta cheese, crumbled
1/4 cup red onion, finely diced
10 Kalamata olives, thinly sliced
2 4-oz cans sardines packed in water, drained
Instructions
1. In a large bowl, place all the dressing ingredients and whisk together until incorporated. Set aside.
2. Chop the tomatoes and cucumber into large chunks and add to the bowl, tossing to coat with the dressing.
3. Add the chickpeas, feta, onion and olives and toss again to coat all the ingredients. Either refrigerate until ready to serve or move on to step 4.
4. Divide the salad among four serving dishes and top each dish with 1/2 a can of sardines (about 2 sardine filets). Serve immediately.
I only used one can of sardines (1/2 for dinner one night and 1/2 for lunch the next day) and I had the remaining salad without sardines as a side the next night and as lunch with some crusty bread the following day. The salad (and the dressing that goes on it) is really flexible. Have fun with it!
Wednesday, May 19, 2010
Pure2Raw Treats
When I attended FitBloggin'10 back in March, I met the two lovely ladies who run Twin Cakes Bakery, "Raleigh's first completely gluten-free, wheat-free, vegan, peanut-free, corn-free, soy-free, and casein-free bakery", and Pure2Raw, their raw, uncooked bakery. Now I admit, I was totally hesitant to try any of their products. My experience with "free" and raw products hasn't been stellar in the past. But when the twins, Michelle and Lori, provided samples of their baked treats and raw snacks for one of our snack breaks, I was pleasantly surprised. So surprised, in fact, that I emailed them and told them I'd love to review their products on my blog.
As a wanna-be foodie who is always looking for healthy snacks, I thought this was the perfect opportunity to spread the word about my new discovery. Within days of emailing the twins, I received a carefully packed box of treats cushioned with recycled packing materials, because these girls aren't just concerned about the health of their bodies, they care about the health of the environment, too. I couldn't wait to get to work trying these snacks out.
First up were the Pure2Raw flat breads. I had three variations to try: Purple Kale Onion, Swiss Chard Black Sesame, and Onion-free Spinach. My favorite flavor was the Swiss Chard Black Sesame. The sesame flavor was a great addition to the chard but wasn't overpowering. The Onion-free Spinach variation was an easy second favorite, with just a tiny hint of tang (vinegar, maybe?) and a perfectly balanced spinach flavor. The Purple Kale Onion flat bread was a bit too onion-y for me, and I love onion. The flavor was a little sweet with a bite, but the onion just took over. Overall, the flat breads were great. They were dry enough to give a little crunch, but not so dry as to be flavorless. They'd be great for mini open-faced sandwiches or topped with hummus.
Next up were the Pure2Raw crackers. There were four varieties of cracker to try: Cheez, Rosemary, Collard Green Onion, and Pumpkin Seed Kale. Overall, the crackers were crunchier than the flat breads, as would be expected. Their flavors were fantastic and I liked them all. My favorite was the Rosemary cracker, with a flavor that was the perfect combination of savory and sweet. The Collard Green Onion was another favorite, with just enough onion that it didn't overpower the cracker. The Cheez and Pumpkin Seed Kale crackers didn't disappoint either. Their flavors were interesting without being too potent or strange. And I'm still trying to figure out how the Pure2Raw ladies managed to create the "cheese" flavor without actually adding cheese.
Finally, I got to dessert: a Gluten-free Vegan Chocolate Chip Cookie, a Raw Brownie Bite, and a Mint Chocolate Bite. I'd take any of these desserts any day of the week. The Chocolate Chip Cookie was surprisingly good. It wasn't soft, but it wasn't hard either -- the perfect chewy texture and chocolaty sweetness. The Raw Brownie Bite had a great dark chocolate flavor with a hint of coconut. The texture was chewy and the flavor was lightly sweet, the perfect fix for any chocolate craving. I saved the Mint Chocolate Bite for last because it's what grabbed my attention at FitBloggin' and prompted me to write this review in the first place. I love mint and it's addition to the Brownie Bites only makes them more perfect.
After having the opportunity to try some of Michelle and Lori's wonderful products, I'll most definitely be ordering from them in the future. If you're in the Raleigh area, stop by and say hello at the Carrboro and Durham farmers markets on Saturdays. And if you're not lucky enough to live nearby, you can always check out their products online and order from there.
Thanks to the twins for letting me check out their products and share them with my readers. I wish them the best of luck in their business. We could use more innovative bakers like them!
Disclaimer: I received free samples of the products mentioned in this post from Twin Cakes Bakery. I am not, however, receiving any compensation for writing this post and all opinions expressed here are solely my own.
Tuesday, February 23, 2010
Recipe: Asian Noodle and Shrimp Salad
It may sound odd, but I love to watch Food Network while I'm working out. Last week, I was sweating it out on the elliptical while watching Cooking for Real with Sonny Anderson and she made this great combination of Hawaiian and Asian dishes. As soon as I saw her Asian Noodles I knew I wanted to try making them. On my way home that night I stopped at the grocery store and picked up the ingredients I didn't have on hand.
I made a few tweaks for the purpose of creating a meal rather than a side dish, but the resulting salad was a spicy-sweet, satisfying treat.
(Adapted from Sonny Anderson)
Makes 4 servings
Ingredients
Dressing:
1 lime, juiced
1/4 cup seasoned rice vinegar
1 TBSP honey
2 cloves garlic, minced
2 tsp sesame oil
1 tsp crushed red pepper flakes
4 TBSP cilantro leaves
Salad:
12 oz. cooked shrimp
1 pkg. rice noodles (14 oz)
1 large carrot
1/2 large cucumber
1 large scallion, thinly sliced
3 TBSP dry-roasted peanuts
Instructions
1. Prepare the noodles according to the package directions.
2. While the noodles are cooking, whisk together all of the dressing ingredients in a large bowl. Add the shrimp and toss to coat them. Set aside.
3. Grate the carrot and cucumber. Add them along with the sliced scallion to the bowl with the shrimp and dressing. Toss to coat.
4. When the noodles are done, drain them, rinse them with cold water and then drain them again. Add them to the bowl with the other ingredients, add the peanuts and toss everything together until it's well mixed. Serve and enjoy!
Wednesday, February 17, 2010
Recipe: Vegetarian Kitchen Sink Stew
OK, so there isn't any kitchen sink in this stick-to-your-ribs vegetarian stew, but that's about the only thing I didn't put in it. This stew made good use of all those vegetables that were hanging around in my crisper drawer, along with some of the leftover beans from the batch I made for my red beans and rice. If you don't have some of the vegetables I used, you could substitute whatever root vegetables you have on hand.
I didn't snap a picture because, honestly, I wasn't expecting it to be blog-worthy. Surprisingly, it turned out to be one of the best vegetarian meals I've made. My carnivorous boyfriend even gave it his seal of approval, saying "That was pretty good considering it didn't have any meat in it."
Vegetarian Kitchen Sink Stew
(Adapted from Vegetarian Times)
Ingredients
2 TBSP olive oil, divided
1/2 large red onion, cut into 1/4" wedges
2 stalks celery with leaves, chopped
4 medium carrots, cut into 1" pieces
4 medium potatoes, cut into 1" pieces
1 large sweet potato, cut into 1" pieces
8 oz. Brussels sprouts, trimmed and halved
3 cloves crushed garlic
1/4 tsp salt
1/4 tsp freshly ground pepper
1 1/2 cups vegetable broth
1/4 dry white wine
1 TBSP soy sauce
1/2 tsp sage
1/2 tsp thyme
1/2 tsp savory
1 1/2 cups red beans, drained and rinsed
Instructions
1. Coat the bottom of the crock pot with 1 TBSP of the olive oil. Add the vegetables and toss them to coat with the oil.
2. Add the garlic cloves, salt and pepper. Cover with the broth, wine and soy sauce. Sprinkle with the sage, thyme and savory and then drizzle with the remaining TBSP of olive oil. Do not mix at this point.
3. Cover and cook on Low for 5 to 7 hours. Stir in the beans about 2o minutes before serving.
I cooked the stew long enough that some of the potatoes were very soft and created a thick sauce when I stirred in the beans, which I liked. If your potatoes aren't quite as cooked, the sauce will be thinner, but you could also mash a couple of potato chunks against the side of the pot and stir them into the liquid before serving. I ate the stew with biscuits, but it would also be really good with crusty French or Italian bread.
Thursday, February 11, 2010
Recipe: Warming Up with Butternut Squash Risotto
I have to admit that the idea of making risotto has always scared me. I've heard all about how difficult it is, how long it takes, how only the best cooks should even attempt it. But a few months back, I saw a 12-year-old on the Today Show make risotto and claiming it was easy! Easy! Well, I thought, if a 12-year-old can make it, then certainly I can. So I went to the store and got the ingredients for a risotto I'd found searching the internet.
Then I promptly waited a couple of weeks (thank God squash keeps well) to try it. When I finally got up the nerve to make it, I did it in stages. Monday night, I chopped up the squash and onions. Tuesday night, I pulled the rice and stock from the pantry. Finally, on Wednesday I came home straight from work and got busy. In about 45 minutes, I had the most creamy, flavorful meal I'd ever had. And it really wasn't that difficult. (I will admit, though, that I undercooked the rice a bit this first time around. But because it still tasted wonderful, my mistake only encouraged me to give it another try.)
Fast forward to the week of the "snow-pocalypse" and here I am, snowed in with all the ingredients I need and nothing but time on my hands to give this risotto a second go-round. And so I did.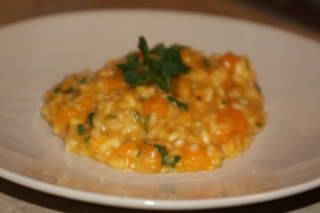
(Adapted from Martha Rose Shulman)
Ingredients
6 cups stock or broth
2 TBSP olive oil
1 small onion, chopped
1 small butternut squash (abt. 1 lb), peeled and finely diced
3 garlic cloves, pressed
1/4 tsp salt
1 1/2 cups Arborio rice
1/2 cup cooking sherry
1/2 cup freshly grated Parmesan cheese
1/2 cup chopped fresh parsley, plus more for garnish
1 tsp nutmeg
Freshly ground pepper
Instructions
1. Bring the stock to a simmer and keep warm throughout the process.
2. Heat the olive oil over medium heat in a large skillet. Add the onion and cook until slightly softened. Add the squash, garlic and salt and stir. Cook until the squash begins to soften, stirring occasionally, about 10 minutes.
3. Stir in the rice and cook stirring constantly until grains crackle, about 2 or 3 minutes. Add the sherry and stir constantly until almost all the liquid is evaporated. Add 1/2 a cup of the stock, stirring often until it is absorbed.
4. Continue adding the stock 1/2 a cup at a time as it is absorbed, stirring often, until the rice is cooked through (soft but not too mushy).
5. Add a final 1/2 cup of stock along with the Parmesan cheese, nutmeg, parsley and pepper to taste. Remove from heat and stir for a few seconds until well combined. Serve immediately, garnished with additional parsley sprigs.
This risotto is so rich and satisfying that my mouth is watering just typing this up. I can't wait to dig into the leftovers tonight. If you've been afraid (or just a little hesitant) to try making risotto, give this recipe a try. It's more labor intensive than some meals, but it's well worth the work.
Wednesday, February 10, 2010
Recipe: Slow Cooker Red Beans and Rice
I've been cooking away over the last few days, partly to pass the time and partly because of this strange nesting urge I've had since the snow started falling. Of all that I've cooked so far, I thought I'd share this recipe because I really enjoyed it and it makes use of my newest favorite (and ever useful) appliance, the slow cooker.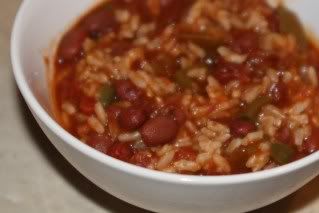
(Adapted from Fresh from the Vegetarian Slow Cooker)
Ingredients
1/2 TBSP olive oil
1 small yellow onion, chopped
1 medium green pepper, chopped
3 garlic cloves, pressed or minced
1/4 cup tomato paste
2 tsp chili powder
3 cups red beans (or two 15.5 oz cans, drained and rinsed)
1 14.5 oz can diced tomatoes with green chilies
1.5 cups water or vegetable broth
1 tablespoon soy sauce
Salt and pepper to taste
3 cups cooked brown rice
Instructions
1. In a large skillet, heat the oil over medium heat. Add the onion, pepper and garlic and cook until just softened, about five minutes. Remove from heat and add the tomato paste and chili. Stir to coat the vegetables.
2. Transfer the vegetables to the slow cooker (at least 4-quarts). Add the beans, tomatoes, water and soy sauce. Season with a little slat and freshly ground pepper. Cover and cook on Low for 6 to 8 hours.
3. Just before serving stir in the rice (or serve over rice, if preferred).
This was a filling and flavorful meal. The green chilies gave it a little bit of a kick without making it too spicy, but you could use regular diced tomatoes if you prefer less heat. I served it with some fresh baked whole wheat bread, but it would have been delicious with a little crusty french bread or some warm corn bread (thanks to Kat for those suggestions!). And if you're only cooking for one or two people, don't worry, it was even better as leftovers!
Monday, February 01, 2010
Recipe: Black Bean Chili with a Kick
One of my 101 Things involves choosing and preparing slow cooker meals. An advantage to the slow cooker is that during the week I can do all my prep the evening before and then toss everything together before I head to work in the morning. Or if I'm expecting a busy week, I can put something together over the weekend that will feed me all week long.
I started my slow cooker adventures with that Chipotle Chili I loved so much, and this weekend, I tried another chili that used up things I had in my refrigerator and pantry. It was easy and tasty, and totally vegetarian. I'm looking forward to trying something other than chili in the coming weeks. I've flagged several recipes that look interesting and I'll be sure to post the results as I prepare them.
Spicy Black Bean Chili
(Adapted from Fresh from the Vegetarian Slow Cooker)
Ingredients
1 TBSP olive oil
1 large yellow onion, chopped
1 red bell pepper, chopped
1 green bell pepper, chopped
1 stalk celery, finely chopped
2 garlic cloves, crushed or minced
2 TBSP chili powder (or more to taste)
1 28-oz can crushed tomatoes
2 15.5-oz cans black beans, rinsed and drained
1 cup vegetable (or other) stock
1 4-oz can diced green chiles
Salt and pepper to taste
Instructions
1. In a large skillet, warm oil over medium heat. Add the onions, peppers, celery, and garlic and cook until slightly softened, about 5 minutes. Add the chili powder and stir until well combined.
2. Transfer the vegetables to the slow cooker (4- to 6-quart). Add the remaining ingredients and season with salt and pepper. Stir to mix well. Cover and cook on Low for 6 to 8 hours.
This chili came out thick and flavorful after about 7 hours in the slow cooker. I served it with a little shredded cheddar and a dollop of sour cream on top and had corn bread muffins on the side.
Tuesday, November 24, 2009
Recipe: A Chipotle Twist on Chili
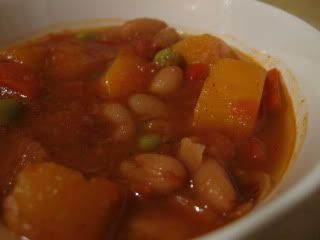
The first recipe I decided to make was Chipotle-Kissed Red Bean and Sweet Potato Chili. It's the only recipe I've tried so far, and I've made it twice--it's THAT good. I could eat this chili everyday for the entire comfort-food season and be totally happy.
I made a few adjustments, because the first time I made it I found it to be more like soup than like chili. I like my chili chunky and thick. Here's the version I created.
Ingredients
1 TBSP olive oil
1 medium yellow onion, chopped
1 medium red bell pepper, chopped
1 large clove garlic, minced or pressed
1 TBSP chili powder
1 1/2 lb sweet potatoes, peeled and cut into 1/2" pieces
2 14.5-oz can diced tomatoes
1 cup fresh or frozen peas
1 15-oz can dark red kidney beans
1 15-oz can white kidney (cannellini) beans (or other favorite bean)
1 1/2 cups water
salt to taste
1 canned chipole chili in adobo sauce (or to taste), finely chopped
Instructions
In a large skillet, heat the oil over medium heat. Add the onion, bell pepper and garlic and cook, stirring, until softened, about 5 minutes. Stir in the chili powder and cook for about a minute. Add the sweet potatoes and stir to coat with spices. (I did this step the night before and then put the "starters" in the refrigerator over night. In the morning I continued with the following step.)
Transfer to a 4- to 6-quart slow cooker. Add the tomatoes, peas, beans and water. Season with salt, cover and cook on Low for 6 to 8 hours.
Before serving, stir in the chipotle pepper and taste to adjust seasoning. Serve with crackers or corn bread.
Thursday, November 19, 2009
Recipe: Bean and Chard Stuffed Acorn Squash
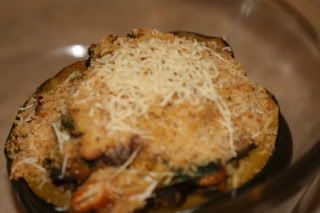
While I loved the flavor of the dish, I cooked it one night and ate it as leftovers for the rest of the week. I have to admit that it would probably have been better immediately out of the oven, because they seemed a little dry the next day. You might want to keep that in mind and make adjustments accordingly.
Ingredients
2 medium acorn squash, halved, seeds removed
1 tsp plus 2 TBSP olive oil, divided
1/2 tsp salt, divided
1/2 tsp pepper, divided
1/2 cup chopped onion
2 cloves garlic, minced
2 TBSP water
1 TBSP tomato paste
8 cups chopped chard leaves
1 15-oz can white beans, drained and rinsed
1/4 cup chopped kalamata olives
1/3 cup coarse dry whole-wheat breadcrumbs
1/3 cup grated Parmesan cheese
Instructions
Lay squash halves in a 9x13 microwave-safe baking dish, cut sides up. (If they stand on their own, you can slice a thin piece off the bottom so that they do.) Brush the insides of with 1 tsp oil and sprinkle with 1/4 tsp each salt and pepper. Cover with plastic wrap and microwave on High until the squash is fork tender, about 12 minutes.
In the meantime, heat 1 TBSP oil in a large skillet over medium heat. Add onion and cook, stirring, until it starts to brown, about 3 minutes. Add garlic and cook stirring for another minute. Add water and tomato paste, along with the remaining salt and pepper. Stir in chard, cover and cook until tender, about 5 minutes. Add the white beans and olives and stir, cooking until heated through, about 2 minutes more. Remove from the heat.
Preheat the broiler (I used the oven, 350 degrees).
Mix the breadcrumbs, Parmesan and 1 TBSP oil in a small bowl. Fill each squash half with about a cup of the chard mix. Sprinkle with the breadcrumb mixture and broil (or bake) until the breadcrumbs are browned. Grate a little Parmesan on top of each squash and serve.
Friday, August 07, 2009
CSA Report - Week 9
We got our first heirloom tomatoes this week! Unfortunately, you won't see it in that picture below because I promptly sliced it and ate it before remembering to take the photo. I got another good-sized share this week:

- 2 lbs potatoes
- .25 lb chard
- 1 head of lettuce
- 1 large tomato (not pictured)
- 1 yellow squash
Looking forward to using up this week's share...
Saturday, August 01, 2009
OLS Week 9 - Balsamic Eggplant and Tomato Stacks

Instead, I decided to grill the eggplant slices. I marinated them in balsamic vinegar and olive oil and tossed them on the old George Foreman until they were tender. Then I stacked the slices with chevre, basil, and tomato slices. I drizzled them with balsamic vinegar and savored every bite. As Rachel Ray would say, Yum-O!
(Local Low-Down: eggplant, tomatoes and chevre from the farmers market and basil from my back yard. Vinegar and olive oil not local.)
I also made a few mostly local dishes throughout the week. There was the Spinach and Goat Cheese Pasta (all local but the pasta, salt and pepper and oil). This dinner was delicious and the leftovers were just as good. I ate them several nights in a row.
It's been a great week for local eating!

Thursday, July 30, 2009
CSA Report - Week 8
Oh, the joy of fresh vegetables straight from the farm! I can't tell you enough how much I love knowing exactly where and how my vegetables are grown.
- 2 lbs potatoes
- 1/2 lb chard
- 1/2 lb mustard greens (what to do with these?)
- 1 head of lettuce
- 1 bunch scallions
Tuesday, July 28, 2009
Spinach and Goat Cheese Pasta Recipe
I just finished cooking and immediately eating the best dinner I've had in ages. This recipe, inspired by one I saw on Giada, had three of my favorite ingredients: pasta, spinach, and my new love chevre. The resulting pasta dish was creamy, rich and full of flavor. Trust me, you want to try this one!
Ingredients:
1 lb rigatoni
2 tsp olive oil, divided
1 small onion, sliced
1 large garlic clove, minced
6 cups packed fresh spinach, roughly chopped
1 cup cherry tomatoes, halved (or quartered if large)
6 oz soft goat cheese
salt and pepper to taste
Instructions:
Bring a large pot of salted water to boil and add pasta. Cook and then drain, reserving at least 1 cup of pasta water. Set aside.
In a large skillet, heat 1 tsp olive oil over medium heat. Add garlic and onion, cooking until the onion is soft and beginning to caramelize. Toss in the spinach and tomatoes, heating until the spinach is just wilted and still bright green. Remove from heat.
Add the pasta to the skillet and crumble the goat cheese over it. Stir or toss with tongs until the cheese is melted, adding enough of the reserved pasta water to create a sauce. Add salt and pepper to taste and serve.


 Posts


